Android ブラウザからAndroidアプリを開く

柴犬は熟睡しています。気持ちよさそうです。
概要
次のURLで「Androidブラウザからのアプリ起動」のコミュニティを見て実行したくなりました。
https://groups.google.com/g/android-group-japan/c/Uyw6SAa-dxcその中で次のような記事がありましたので、参考にしました。
これを基に調べてみたところ、本家 Android Developers URL「Android アプリリンクの処理」に詳しい説明がありました。
https://developer.android.com/training/app-links?hl=jaここで使っているのは「ディープリンク」と呼ばれているものらしいです。
ディープリンクは、ユーザーをアプリの特定の部分に直接誘導する、あらゆるスキームの URI です。ディープリンクを作成するには、アプリ内の適切なアクティビティにユーザーを誘導するインテント フィルタを追加します。次のコード スニペットをご覧ください


<activity
    android:name=".MyMapActivity"
    android:exported="true"
    ...>
    <intent-filter>
        <action android:name="android.intent.action.VIEW" />
        <category android:name="android.intent.category.DEFAULT" />
        <category android:name="android.intent.category.BROWSABLE" />
        <data android:scheme="geo" />
    </intent-filter>
</activity>
次のURLはディープリンクの詳しい説明です。
https://developer.android.com/training/app-links/deep-linking?hl=jadata構文
<data android:scheme="string"
      android:host="string"
      android:port="string"
      android:path="string"
      android:pathPattern="string"
      android:pathPrefix="string"
      android:pathSuffix="string"
      android:pathAdvancedPattern="string"
      android:mimeType="string" />
URI
<scheme>://<host>:<port>[<path>|<pathPrefix>|<pathPattern>|<pathAdvancedPattern>|<pathSuffix>]android:scheme
URI のスキーマ部分。これは、URI を指定するうえで最小限の必須属性です。フィルタに対して少なくとも 1 つの scheme 属性を設定する必要があります。この属性を設定していないと、他の URI 属性は意味を持ちません。 android:host
URI 認証局のホスト部分。フィルタに対して scheme 属性も指定されていないと、この属性は意味を持ちません。複数のサブドメインにマッチさせるには、アスタリスク(*)を使用して、ホスト内の 0 個以上の文字にマッチさせます。たとえばホスト *.google.com は、www.google.com、.google.com、developer.google.com にマッチします。アスタリスクは host 属性の最初の文字にしか使えません。path と pathPrefix
path 属性は、Intent オブジェクトの完全パスに対してマッチングされる完全パスを指定します。pathPrefix 属性は、Intent オブジェクトのパスの最初の部分のみに対してマッチングされる部分パスを指定します。他のアプリと連携する
表題のことについて。、次の本家のURLで詳しい説明があります。
https://developer.android.com/training/basics/intents?hl=jaいろいろ試行錯誤しましたが、なんとかできましたので記録することにします。

2024年2月26日現在
WEBのみでは断片的で覚えにくいので最初に購入した Kotlin の本です。

Project の全体
こんな感じです。
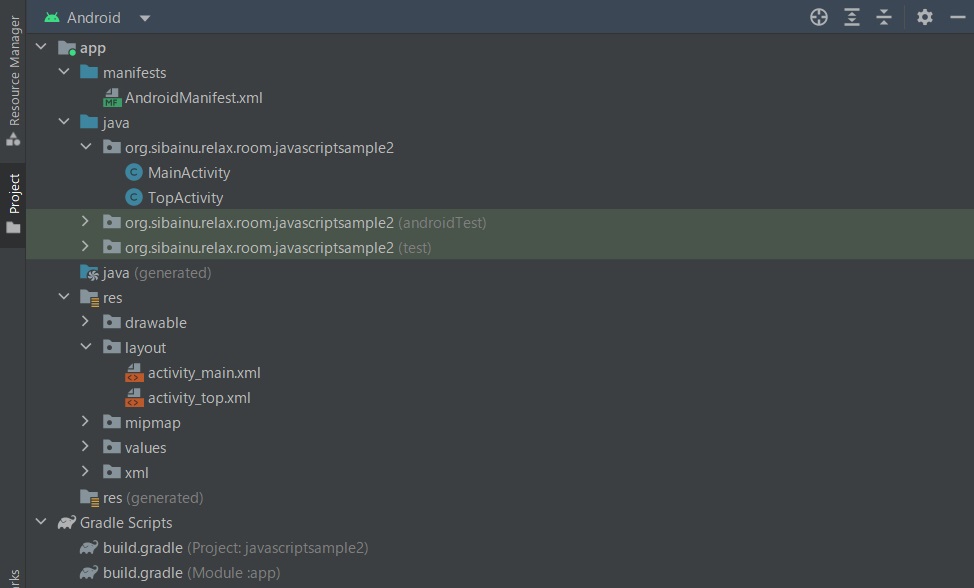
AndroidManifest.xml
最初、この MainActivity だけにしたのですが、実行すると Unable to determine activity name とエラーになりました。
        <activity
            android:name=".MainActivity"
            android:exported="true">
            <intent-filter>
                <action android:name="android.intent.action.VIEW" />
                <category android:name="android.intent.category.DEFAULT" />
                <category android:name="android.intent.category.BROWSABLE" />
                <data
                    android:scheme="sibainu"
                    android:host="relax"
                    android:path="/room"/>
            </intent-filter>
        </activity>
ここは、任意の名称でよいので区別しやすいものにします。
android:scheme、android:host は必須で、android:path は任意です。
                <data
                    android:scheme="sibainu"
                    android:host="relax"
                    android:path="/room"/>
メインとなる Activity がないというエラーのようですので、ダミーで TopActivity を作りました。
        <activity
            android:name=".TopActivity"
            android:exported="true" >
            <intent-filter>
                <action android:name="android.intent.action.MAIN" />

                <category android:name="android.intent.category.LAUNCHER" />
            </intent-filter>
        </activity>
ですので、全体のコードはつぎのようになりました。
<?xml version="1.0" encoding="utf-8"?>
<manifest xmlns:android="http://schemas.android.com/apk/res/android"
    xmlns:tools="http://schemas.android.com/tools">

    <uses-permission android:name="android.permission.INTERNET" />
    <uses-permission android:name="android.permission.ACCESS_NETWORK_STATE" />
    <uses-permission android:name="android.permission.ACCESS_WIFI_STATE" />

    <application
        android:allowBackup="true"
        android:dataExtractionRules="@xml/data_extraction_rules"
        android:fullBackupContent="@xml/backup_rules"
        android:icon="@mipmap/ic_launcher"
        android:label="@string/app_name"
        android:roundIcon="@mipmap/ic_launcher_round"
        android:supportsRtl="true"
        android:theme="@style/Theme.Javascriptsample2"
        tools:targetApi="31">

        <activity
            android:name=".TopActivity"
            android:exported="true" >
            <intent-filter>
                <action android:name="android.intent.action.MAIN" />

                <category android:name="android.intent.category.LAUNCHER" />
            </intent-filter>
        </activity>

        <activity
            android:name=".MainActivity"
            android:exported="true">
            <intent-filter>
                <action android:name="android.intent.action.VIEW" />
                <category android:name="android.intent.category.DEFAULT" />
                <category android:name="android.intent.category.BROWSABLE" />
                <data
                    android:scheme="sibainu"
                    android:host="relax"
                    android:path="/room"/>
            </intent-filter>
        </activity>

    </application>

</manifest>
HTML
ブラウザ側の HTML はリンクを次のような形にします。
var scheme = 'sibainu';
var host = 'relax';
var path = '/room';
var url = scheme + '://' + host + path;
url += '?param1=hoho';
url += '¶m2=gege';
url += '¶m3=fufu';
url += '¶m4=gaga';AndroidManifest.xml での値を使います。
                <data
                    android:scheme="sibainu"
                    android:host="relax"
                    android:path="/room"/>
HTMLは次のような簡単なものです。
<!DOCTYPE html>
<html>
<head>
<meta charset="UTF-8">
<meta name="viewport" content="width=device-width, initial-scale=1.0,
maximum-scale=1.0, user-scalable=no" />
<style>
#sample {
border: 1px solid #999;
width: 140px;
text-align: center;
padding: 10px;
color: #666;
background-color: #eee;
cursor: pointer;
}
</style>
<script type="text/javascript">
var init = function () {
var scheme = 'sibainu';
var host = 'relax';
var path = '/room';
var url = scheme + '://' + host + path;
url += '?param1=hoho';
url += '¶m2=gege';
url += '¶m3=fufu';
url += '¶m4=gaga';
var target = document.getElementById("samplehref");
target.href = url;
alert(url);
document.getElementById("sample").addEventListener("click", function () {
location.replace(url);
}, false);
};
window.addEventListener("load", init);
</script>
</head>
<body>
<br>
<br>
<br>
<br>
<p id="sample">Androidアプリの起動</p>
<br>
<br>
<br>
<br>
<a id="samplehref" href="">Androidアプリの起動</a>
</body>
</html>
TopActivity.java
ダミーのようなものですので簡単です。
onCreate に finish() を書いていますので、瞬間フラッシュのようになります。
package org.sibainu.relax.room.javascriptsample2;

import androidx.appcompat.app.AppCompatActivity;

import android.os.Bundle;

public class TopActivity extends AppCompatActivity {

    @Override
    protected void onCreate(Bundle savedInstanceState) {
        super.onCreate(savedInstanceState);
        setContentView(R.layout.activity_top);
        finish();
    }
}
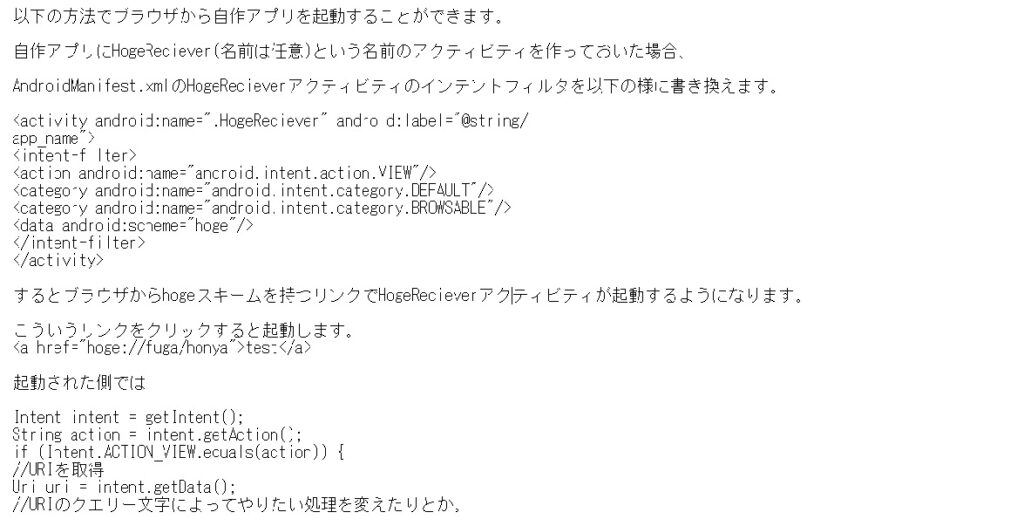
MainActivity.java
パラメータの受け取りは次のようにします。
        Intent intent = getIntent();
        String action = intent.getAction();

        if (Intent.ACTION_VIEW.equals(action)) {
            //URIを取得
            Uri uri = intent.getData();
            //URIのクエリー文字によってやりたい処理を変えたりとか。
            String str1 = uri.getQueryParameter("param1");
            String str2 = uri.getQueryParameter("param2");
            String str3 = uri.getQueryParameter("param3");
            String str4 = uri.getQueryParameter("param4");

            省略
        }
全体は次のようになります。
package org.sibainu.relax.room.javascriptsample2;

import androidx.appcompat.app.AppCompatActivity;

import android.content.Intent;
import android.net.Uri;
import android.os.Bundle;

public class MainActivity extends AppCompatActivity {

    @Override
    protected void onCreate(Bundle savedInstanceState) {
        super.onCreate(savedInstanceState);
        setContentView(R.layout.activity_main);

        Intent intent = getIntent();
        String action = intent.getAction();

        if (Intent.ACTION_VIEW.equals(action)) {
            //URIを取得
            Uri uri = intent.getData();
            //URIのクエリー文字によってやりたい処理を変えたりとか。
            String str1 = uri.getQueryParameter("param1");
            String str2 = uri.getQueryParameter("param2");
            String str3 = uri.getQueryParameter("param3");
            String str4 = uri.getQueryParameter("param4");

            String str = str1 + "\n";
            str += str2 + "\n";
            str += str3 + "\n";
            str += str4;

            TextView tv;
            tv = findViewById(R.id.textView);
            tv.setText(str);
        }
    }
}
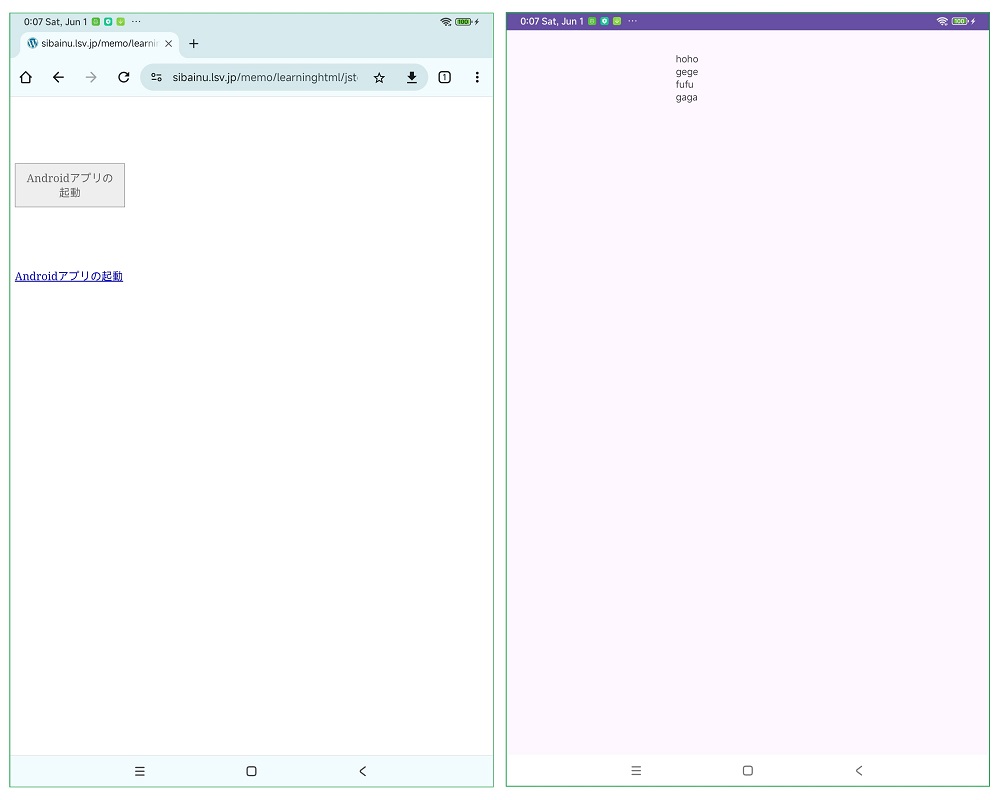
実行
最初に Androidアプリを起動します。瞬間的に開いて閉じます。
次にブラウザを開いてリンクをクリックしますと、右のようにレイアウト activity_main.xml が開いて送られてきたパラーメータが表示されました。
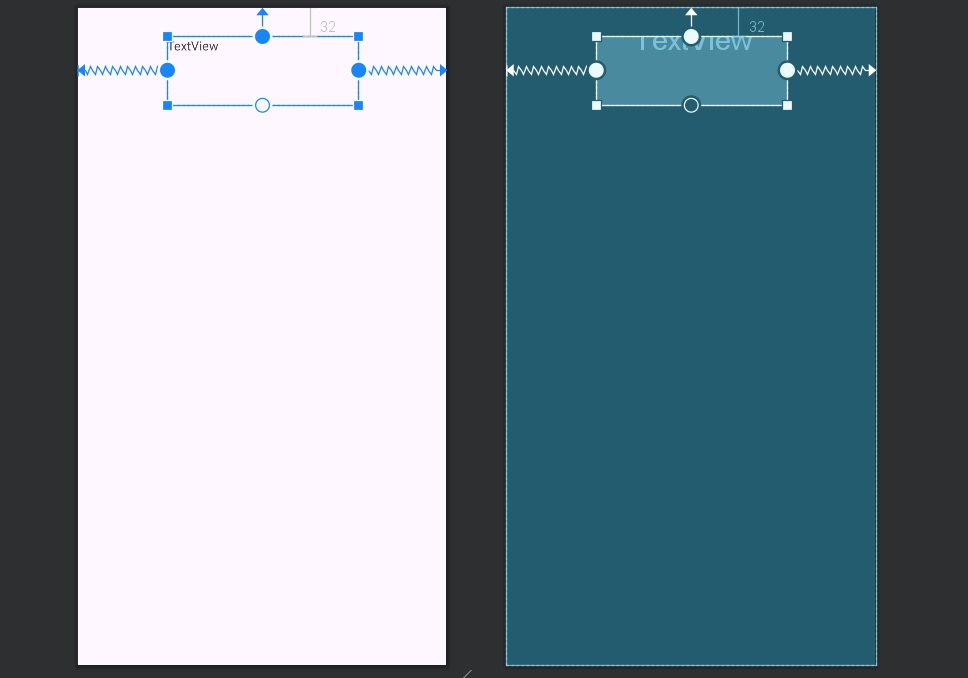
activity_main.xml
TextView がひとつの簡単なレイアウトです。
<?xml version="1.0" encoding="utf-8"?>
<androidx.constraintlayout.widget.ConstraintLayout
    xmlns:android="http://schemas.android.com/apk/res/android"
    xmlns:app="http://schemas.android.com/apk/res-auto"
    xmlns:tools="http://schemas.android.com/tools"
    android:layout_width="match_parent"
    android:layout_height="match_parent"
    tools:context=".MainActivity">

    <TextView
        android:id="@+id/textView"
        android:layout_width="212dp"
        android:layout_height="76dp"
        android:layout_marginTop="32dp"
        android:text="TextView"
        app:layout_constraintEnd_toEndOf="parent"
        app:layout_constraintStart_toStartOf="parent"
        app:layout_constraintTop_toTopOf="parent" />

</androidx.constraintlayout.widget.ConstraintLayout>
ここまでとします。