Android javascriptを使ってウェブアプリを作成

今日も12月の中旬とは思えないような暖かい日です。気持ちがいいので眠たいなという顔している柴犬です。
概要
公式HPで下記の「WebView でのウェブアプリの作成」を基に試みました。
https://developer.android.com/guide/webapps/webview?hl=jaかなり悪戦苦闘しましたので記録します。
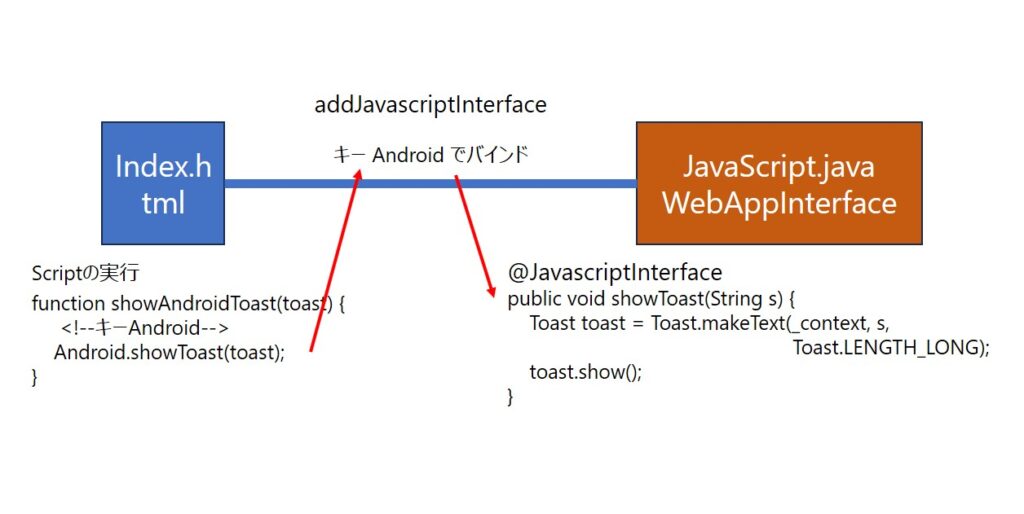
次の図は私の理解です。正しいのか間違っているか分かりません。

2023年10月26日現在
次に紹介する本はちょっと過激な表紙ですが、本の内容はまじめてよく理解できる書き方をしています。先の「Androidアプリ開発」で飛ばしているところを丁寧に説明しているので、これで理解が早まりました。お勧めです。
しかもこれが100円で買え、ボリュームがすごい量です。なので著者に感謝です。


MainActivity.java
package siba.inu.android.js1;

import android.content.Context;
import android.os.Bundle;

import android.webkit.JavascriptInterface;
import android.webkit.WebSettings;
import android.webkit.WebView;
import android.webkit.WebViewClient;
import android.widget.Toast;

public class MainActivity extends AppCompatActivity {

    Context context;

    WebView myWebView;
    WebView wv;
    @Override
    protected void onCreate(Bundle savedInstanceState) {
        super.onCreate(savedInstanceState);
        setContentView(R.layout.activity_main);

        context = this;
        myWebView = (WebView) findViewById(R.id.webView);

        // デフォルトでは、JavaScript は WebView で無効になっています。有効にします。
        //WebSettings webSettings = myWebView.getSettings();
        //webSettings.setJavaScriptEnabled(true);
        //myWebView.setWebViewClient(new WebViewClient());
        // JavaScript コードを Android コードにバインドする(キーAndroid)
        //myWebView.addJavascriptInterface(new WebAppInterface(context), "Android");
        //myWebView.loadUrl("file:///android_asset/index.html");

        WebView wv = new WebView(context);

        // デフォルトでは、JavaScript は WebView で無効になっています。有効にします。
        wv.getSettings().setJavaScriptEnabled(true);
        wv.setWebViewClient(new WebViewClient());
        // JavaScript コードを Android コードにバインドする(キーAndroid)
        wv.addJavascriptInterface(new JavaScript(context), "Android");
        setContentView(wv);
        wv.loadUrl("file:///android_asset/index.html");
    }

    // JavaScript.javaを作らない場合、これを作ります。
    public class WebAppInterface {
        Context _context;

        /** Instantiate the interface and set the context */
        WebAppInterface(Context c) {
            _context = c;
        }

        /** Show a toast from the web page */
        @JavascriptInterface
        public void showToast(String toast) {
            Toast.makeText(_context, toast, Toast.LENGTH_SHORT).show();
        }
    }

}
JavaScript.java
package siba.inu.android.js1;

import android.content.Context;
import android.webkit.JavascriptInterface;
import android.widget.Toast;

public class JavaScript {
    private Context _context;

    public JavaScript(Context context) {
        this._context = context;
    }

    @JavascriptInterface
    public void showToast(String s) {
        Toast toast = Toast.makeText(_context, s, Toast.LENGTH_LONG);
        toast.show();
    }
}
assets/index.html
<html lang="ja">
<head>
    <title>sample</title>
    <meta charset="UTF-8">
    <script src="./js/common.js"></script>
</head>
<body>
    <div>
        <input type="button" id="callButton" value="Say hello" onClick="showAndroidToast('Hello Android!')" />
    </div>
    <script type="text/javascript">
        function showAndroidToast(toast) {
            <!--キーAndroid-->
            Android.showToast(toast);
        }
    </script>
</body>
</html>
AndroidManifest.xml
<?xml version="1.0" encoding="utf-8"?>
<manifest xmlns:android="http://schemas.android.com/apk/res/android"
    xmlns:tools="http://schemas.android.com/tools">

    <uses-permission android:name="android.permission.INTERNET"/>

    <application
        android:allowBackup="true"
        android:dataExtractionRules="@xml/data_extraction_rules"
        android:fullBackupContent="@xml/backup_rules"
        android:icon="@mipmap/ic_launcher"
        android:label="@string/app_name"
        android:roundIcon="@mipmap/ic_launcher_round"
        android:supportsRtl="true"
        android:theme="@style/Theme.Js1"
        tools:targetApi="31">
        <activity
            android:name=".MainActivity"
            android:exported="true">
            <intent-filter>
                <action android:name="android.intent.action.MAIN" />

                <category android:name="android.intent.category.LAUNCHER" />
            </intent-filter>
        </activity>
    </application>

</manifest>
res/layout/activity_main.xml
<?xml version="1.0" encoding="utf-8"?>
<androidx.constraintlayout.widget.ConstraintLayout
    xmlns:android="http://schemas.android.com/apk/res/android"
    xmlns:app="http://schemas.android.com/apk/res-auto"
    xmlns:tools="http://schemas.android.com/tools"
    android:layout_width="match_parent"
    android:layout_height="match_parent"
    tools:context=".MainActivity">

    <TextView
        android:id="@+id/textView"
        android:layout_width="wrap_content"
        android:layout_height="wrap_content"
        android:text="Hello World!"/>

    <WebView
        android:id="@+id/webView"
        android:layout_width="0dp"
        android:layout_height="0dp"
        app:layout_constraintBottom_toBottomOf="parent"
        app:layout_constraintEnd_toEndOf="parent"
        app:layout_constraintStart_toStartOf="parent"
        app:layout_constraintTop_toBottomOf="@+id/textView" />

</androidx.constraintlayout.widget.ConstraintLayout>
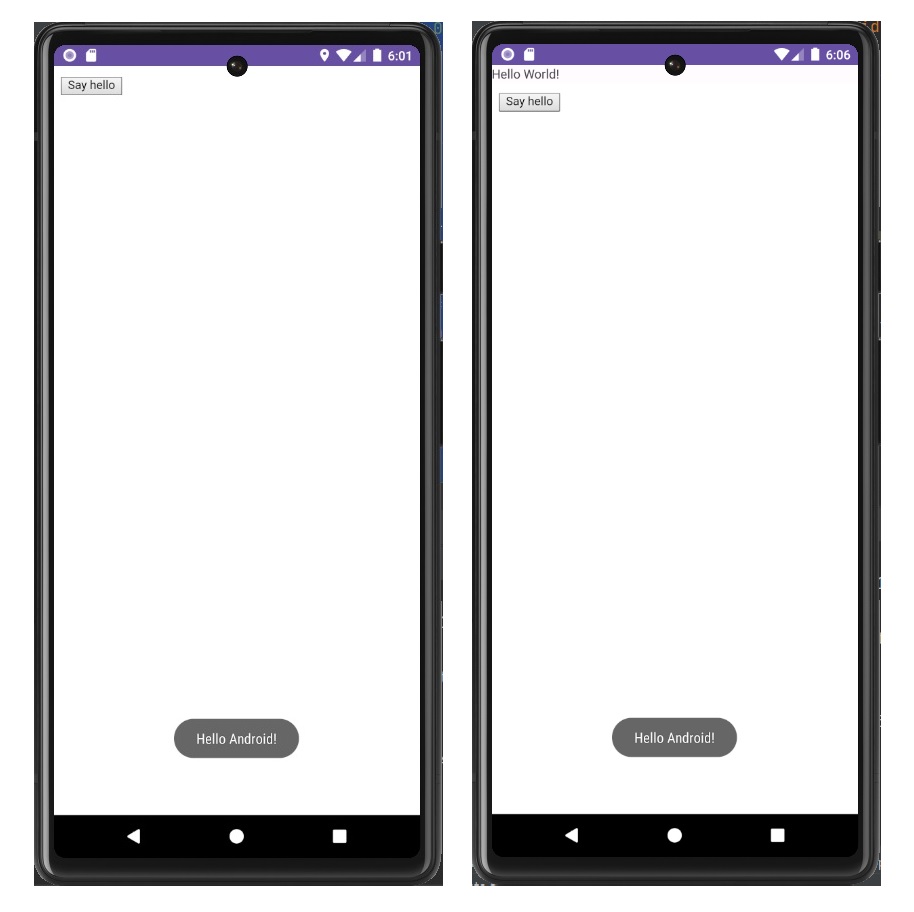
Say hello ボタンをタップした結果
次の画像は AndroidStudio でエミュレートした結果の画像です。想定通りにトーストが表示されました。
左が上の MainActivity.java を実行しています。
右は上の MainActivity.java を変更して実行しています。変更箇所は画像の下にあります。
MainActivity.java の変更箇所です。
        WebSettings webSettings = myWebView.getSettings();
        webSettings.setJavaScriptEnabled(true);
        myWebView.setWebViewClient(new WebViewClient());
        myWebView.addJavascriptInterface(new WebAppInterface(context), "Android");
        myWebView.loadUrl("file:///android_asset/index.html");

        //WebView wv = new WebView(context);
        //wv.getSettings().setJavaScriptEnabled(true);
        //wv.setWebViewClient(new WebViewClient());
        //wv.addJavascriptInterface(new JavaScript(context), "Android");
        //setContentView(wv);
        //wv.loadUrl("file:///android_asset/index.html");
assets フォルダーの作成

assets フォルダーの作成とその直下の js フォルダーの作成に手間取りましたので記録します。
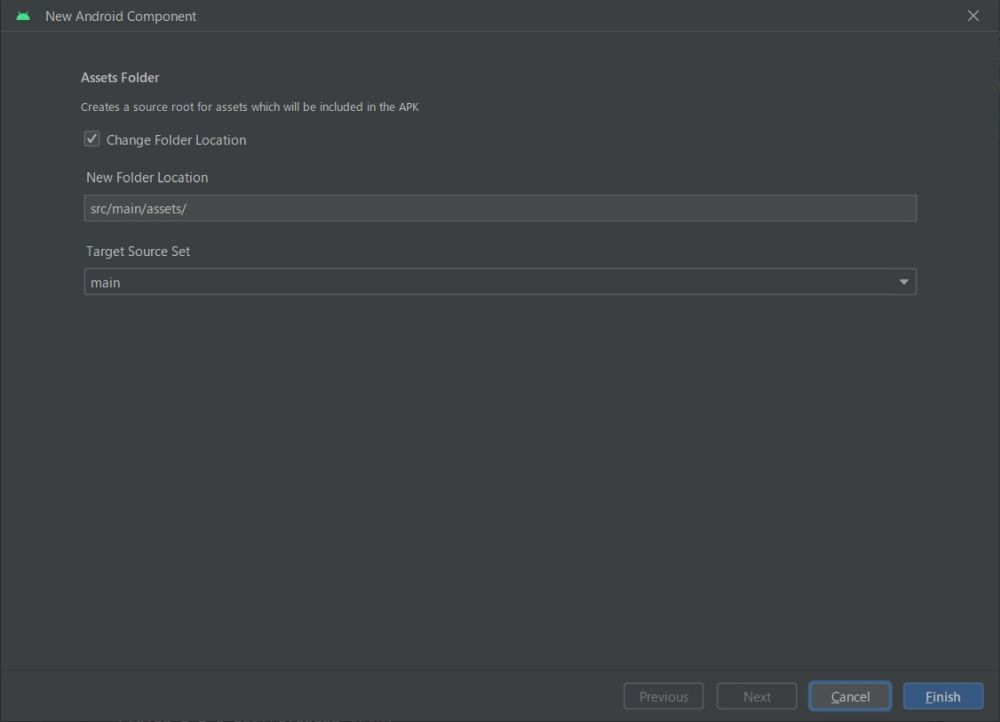
Project タブの app を選択 → メインタブメニュー File → リスト New → リスト Folder
→ リスト Assets Folder とクリックします。

New Android Component フォームが開きますので、初めての場合はこのままでボタン Finish を押下します。
assets が作成されているはずです。
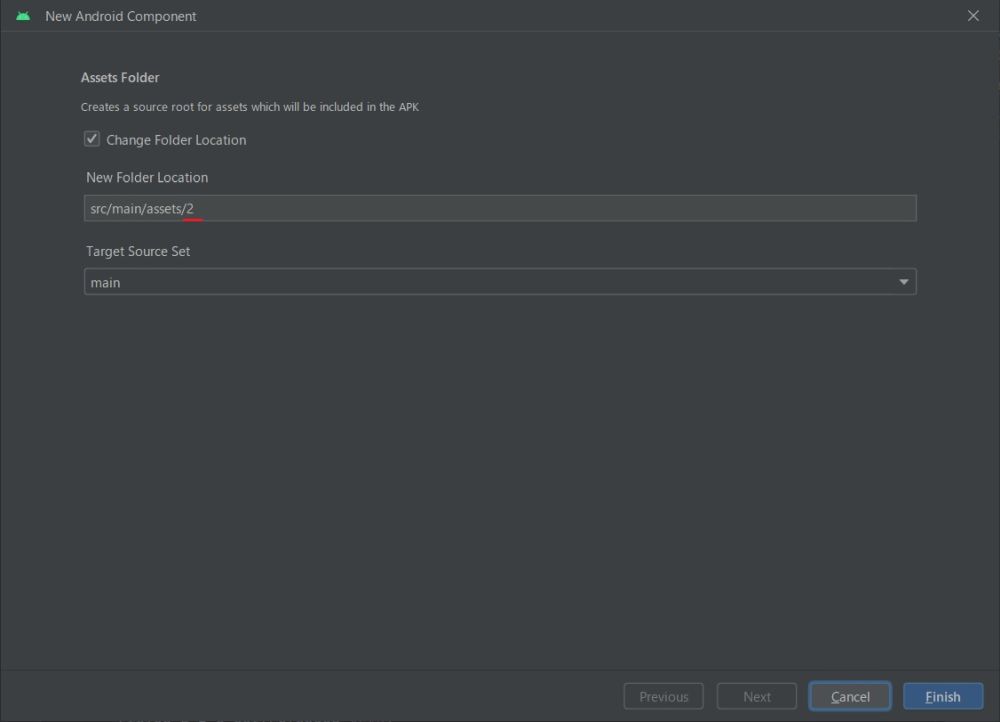
js フォルダーを作成します。
assets の作成を繰り返します。2回目になると次のようになります。
赤線の2を js に変えてボタン Finish を押下します。
assets の直下に js フォルダーが作成されます。