Android Studio でスマホアプリを作ってみた2
柴犬は不思議なものを見たようで、あれは何と聞きたそうな顔をしています。
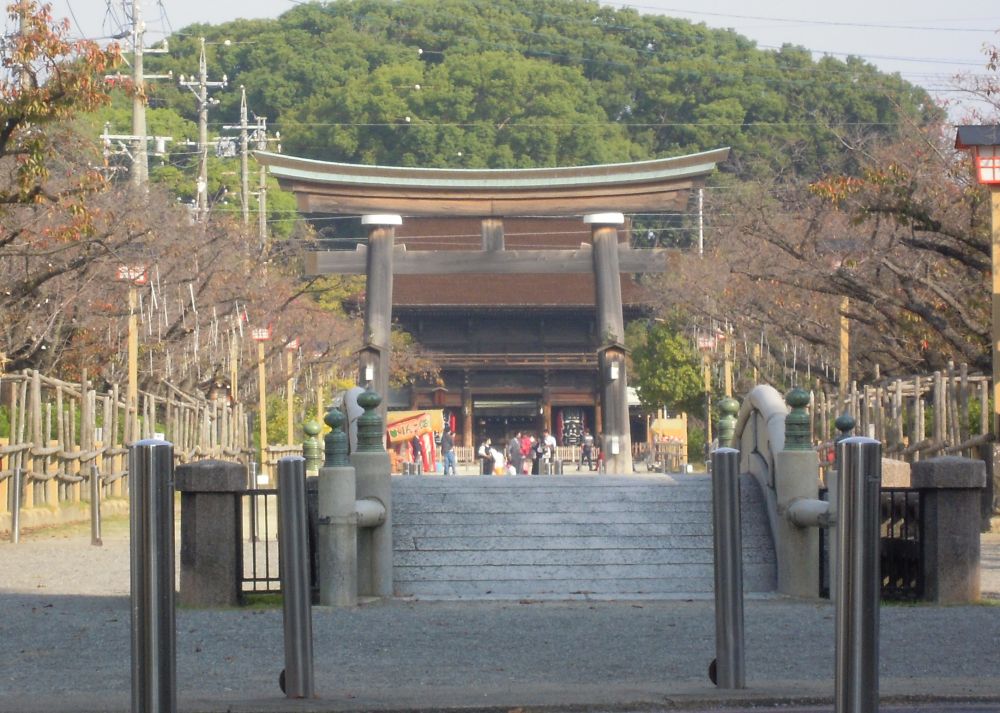
柴犬が見たものは、これです。朝早かったのですが、七五三のお参りする人があり出店も出ていたので気になったようです。
概要
アプリに入力したものを印刷することを試してみました。
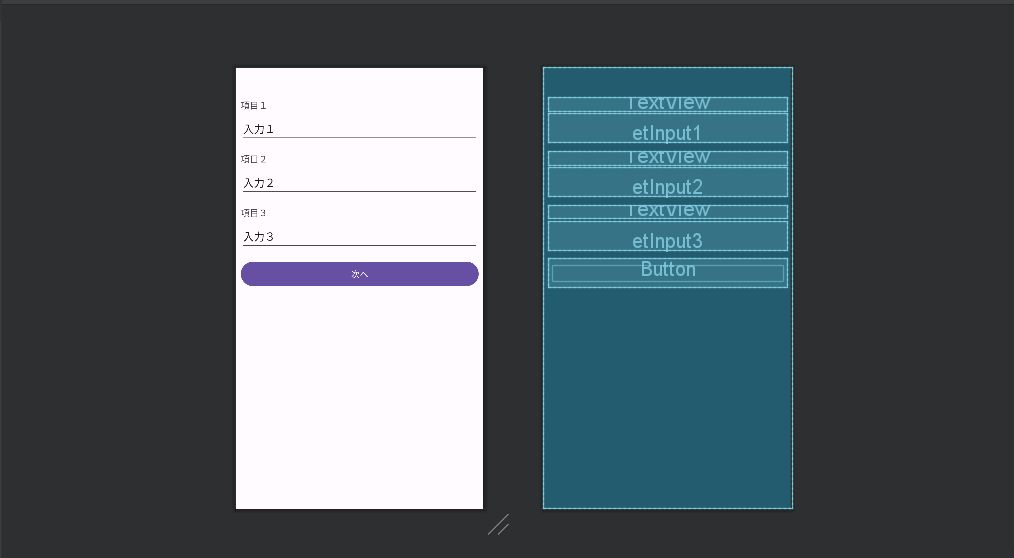
項目を3つ、それに対する入力を3つ作ります。その値をHTMLに編集します。
画面を遷移させてビューに表示させます。それを確かめて印刷ボタンを押下して印刷します。
すなわち値入力のメイン画面と確認用の画面の2画面で構成します。
初めは、PCの印刷の感覚で簡単だろうと思っていましたが、結構手間がかかりました。
キャンバスというものがないのでビューの画面を「Bitmap」で画像を作成してそれを印刷します。
今回の記事も印刷までたどり着けず、確認用の画面表示までで終わっています。
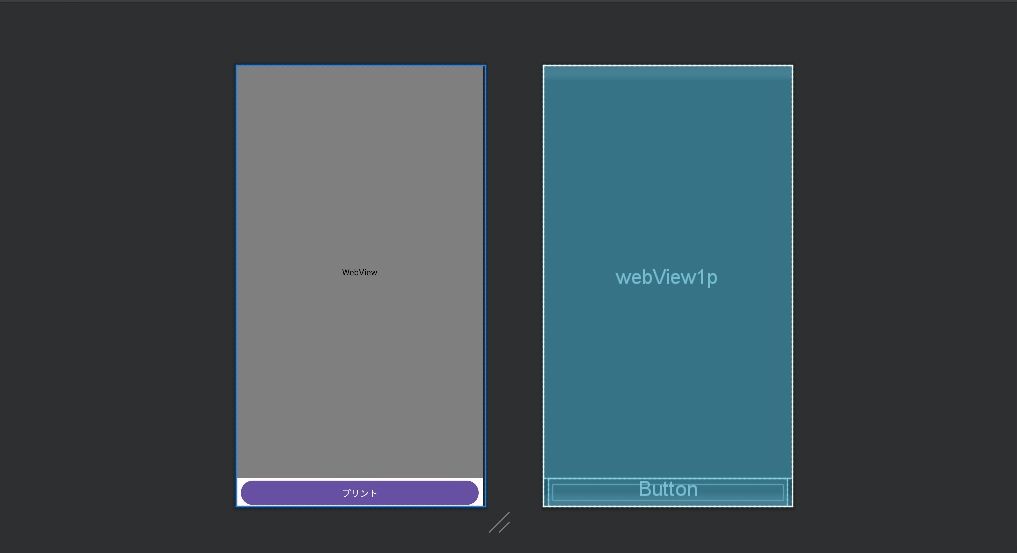
左がメイン画面で、入力が終わったらボタン「次へ」を押下すると右画面に変遷して、画面確認後ボタン「プリント」を押下してプリントに入ります。

今回お世話になりました本です。

2023年10月26日現在
次に紹介する本はちょっと過激な表紙ですが、本の内容はまじめてよく理解できる書き方をしています。先の「Androidアプリ開発」で飛ばしているところを丁寧に説明しているので、これで理解が早まりました。お勧めです。
しかもこれが100円で買え、ボリュームがすごい量です。なので著者に感謝です。


AndroidManifest.xml
2画面なので「activity」が2つになります。
<?xml version="1.0" encoding="utf-8"?>
<manifest xmlns:android="http://schemas.android.com/apk/res/android"
    xmlns:tools="http://schemas.android.com/tools">

    <uses-permission android:name="android.permission.INTERNET" />
    <uses-permission android:name="android.permission.ACCESS_NETWORK_STATE" />

    <application
        android:hardwareAccelerated="true"
        android:allowBackup="true"
        android:dataExtractionRules="@xml/data_extraction_rules"
        android:fullBackupContent="@xml/backup_rules"
        android:icon="@mipmap/ic_launcher"
        android:roundIcon="@mipmap/ic_launcher_round"
        android:supportsRtl="true"
        android:theme="@style/Theme.Test5"
        tools:targetApi="31">
        <activity
            android:name=".MainActivity"
            android:screenOrientation="portrait"
            android:label="@string/app_name"
            android:exported="true">
            <intent-filter>
                <action android:name=
                    "android.intent.action.MAIN" />
                <category android:name=
                    "android.intent.category.LAUNCHER" />
            </intent-filter>
        </activity>

        <activity
            android:name=".PrintActivity"
            android:screenOrientation="portrait"
            android:label="@string/print_page"/>
    </application>

</manifest>
MainActivity.java
次の画面に遷移するのも簡単です。また、引数を持って遷移することもできるので思っているより簡単にできました。
package siba.inu.android.sample;

import androidx.appcompat.app.AppCompatActivity;

import android.annotation.SuppressLint;
import android.content.Intent;
import android.view.View;
import android.widget.Button;
import android.widget.EditText;
import android.widget.TextView;
import android.os.Bundle;

public class MainActivity extends AppCompatActivity {

    private TextView tvTellop1;
    private TextView tvTellop2;
    private TextView tvTellop3;
    private EditText etInput1;
    private EditText etInput2;
    private EditText etInput3;
    private Button btNext;
    private ClickListener listener;

    @Override
    protected void onCreate(Bundle savedInstanceState) {
        super.onCreate(savedInstanceState);
        setContentView(R.layout.activity_main);

        tvTellop1=findViewById(R.id.tvTellop1);
        tvTellop2=findViewById(R.id.tvTellop2);
        tvTellop3=findViewById(R.id.tvTellop3);
        etInput1=findViewById(R.id.etInput1);
        etInput2=findViewById(R.id.etInput2);
        etInput3=findViewById(R.id.etInput3);
        btNext=findViewById(R.id.btnext);
        listener= new ClickListener();
        btNext.setOnClickListener(listener);

    }

    // クリック時のリスナー
    private class ClickListener implements View.OnClickListener {
        @Override
        public void onClick(View view) {
            toNext();
        }
    }

    public void toNext(){
        Intent i=new Intent(this, PrintActivity.class);
        // html文を作成します。
        String htmlDocument = "<html><body><h1>Test Content</h1>"
                + "<p>Testing, testing, testing...</p>"
                + "<p>" + tvTellop1.getText().toString() + ":" + etInput1.getText().toString() + "</p>"
                + "<p>" + tvTellop2.getText().toString() + ":" + etInput2.getText().toString() + "</p>"
                + "<p>" + tvTellop3.getText().toString() + ":" + etInput3.getText().toString() + "</p>"
                + "</body></html>";

        i.putExtra("printdoc",htmlDocument);

        startActivity(i);
    }

}
PrintActivity.java
ビューを「Bitmap」で画像ファイルにしてそれを印刷します。
PDF に変換して印刷もできるようなので機会を改めて挑戦します。その時はまた記録します。
package siba.inu.android.sample;

import java.io.ByteArrayOutputStream;
import java.io.File;
import java.io.FileOutputStream;
import java.util.Calendar;

import android.net.Uri;
import android.os.Bundle;
import android.os.Environment;
import android.app.Activity;
import android.content.Intent;
import android.graphics.Bitmap;
import android.graphics.Bitmap.Config;
import android.graphics.Canvas;
import android.graphics.Picture;
import android.graphics.Bitmap.CompressFormat;
import android.graphics.drawable.PictureDrawable;
import android.util.Log;
import android.view.View;
import android.view.View.OnClickListener;
import android.webkit.WebResourceRequest;
import android.webkit.WebView;
import android.webkit.WebViewClient;
import android.widget.Button;
import com.brother.sdk.lmprinter.Channel;
import com.brother.sdk.lmprinter.OpenChannelError;
import com.brother.sdk.lmprinter.PrintError;
import com.brother.sdk.lmprinter.PrinterDriver;
import com.brother.sdk.lmprinter.PrinterDriverGenerateResult;
import com.brother.sdk.lmprinter.PrinterDriverGenerator;
import com.brother.sdk.lmprinter.PrinterModel;
import com.brother.sdk.lmprinter.setting.QLPrintSettings;

public class PrintActivity extends Activity
        implements OnClickListener {

    static final int REQUEST_CAPTURE_IMAGE = 100;
    private WebView webView;
    private Button button1;
    private File webFile;

    @Override
    protected void onCreate(Bundle savedInstanceState) {
        super.onCreate(savedInstanceState);
        setContentView(R.layout.activity_print);

        webView = findViewById(R.id.webView1p);
        webView.setWebViewClient(new WebViewClient(){
            @Override
            public boolean shouldOverrideUrlLoading(
                    WebView view, WebResourceRequest request) {
                return false;
            }
        });
        String htmlDocument=getIntent().getStringExtra("printdoc");
        webView.loadDataWithBaseURL(null, htmlDocument.toString(), "text/HTML", "UTF-8", null);

        button1 = findViewById(R.id.button1p);
        button1.setOnClickListener(this);
    }

    @Override
    public void onClick(View v) {
        if(v.getId() == R.id.button1p){
            sendContent();
        }
    }

    protected String getPicFileName(){
        Calendar c = Calendar.getInstance();
        String s = c.get(Calendar.YEAR)
                + "_" + (c.get(Calendar.MONTH)+1)
                + "_" + c.get(Calendar.DAY_OF_MONTH)
                + "_" + c.get(Calendar.HOUR_OF_DAY)
                + "_" + c.get(Calendar.MINUTE)
                + "_" + c.get(Calendar.SECOND)
                + ".jpg";
        return s;
    }

    private static Bitmap pictureDrawable2Bitmap(Picture picture) {
        PictureDrawable drawable = new PictureDrawable(picture);
        Bitmap bitmap = Bitmap.createBitmap(
                drawable.getIntrinsicWidth(),
                drawable.getIntrinsicHeight(),
                Config.ARGB_8888);
        Canvas canvas = new Canvas(bitmap);
        canvas.drawPicture(drawable.getPicture());
        return bitmap;
    }

    protected void sendContent(){
        try {
            // WebView の表示内容を画像 (Picture オブジェクト) として取得
            Picture picture = webView.capturePicture();
            Bitmap  bitmap = pictureDrawable2Bitmap(picture);

            ByteArrayOutputStream outStream = new ByteArrayOutputStream();
            bitmap.compress(CompressFormat.JPEG, 80, outStream);
            byte[] imageInByte = outStream.toByteArray();

            // 画像ファイルとして保存
            File path = Environment.getExternalStoragePublicDirectory(
                    Environment.DIRECTORY_PICTURES);
            path.mkdirs();
            File picFile = new File(path, getPicFileName());

            FileOutputStream fileOutStream = new FileOutputStream(picFile);
            fileOutStream.write(imageInByte);
            fileOutStream.close();

            // 印刷の実行
            printImage(picFile);

        } catch (Exception e) {
            e.printStackTrace();
        }
    }

    void printImage(File file) {
        button1.setText(file.getPath());
        Channel channel = Channel.newWifiChannel("IPAddress.of.your.printer");

        PrinterDriverGenerateResult result = PrinterDriverGenerator.openChannel(channel);
        if (result.getError().getCode() != OpenChannelError.ErrorCode.NoError) {
            // Log.e("", "Error - Open Channel: " + result.getError().getCode());
            return;
        }

        // File dir = getExternalFilesDir(null);
        // File file = new File(dir, "YourImageFilename");

        PrinterDriver printerDriver = result.getDriver();
        QLPrintSettings printSettings = new QLPrintSettings(PrinterModel.QL_820NWB);

        printSettings.setLabelSize(QLPrintSettings.LabelSize.DieCutW62H100);
        printSettings.setAutoCut(true);
        printSettings.setWorkPath(file.getPath());

        PrintError printError = printerDriver.printImage(file.toString(), printSettings);
        // PDFも印刷できます
        // PrintError printError = printerDriver.printPDF(file.toString(), printSettings);

        if (printError.getCode() != PrintError.ErrorCode.NoError) {
            // Log.d("", "Error - Print Image: " + printError.getCode());
        }
        else {
            // Log.d("", "Success - Print Image");
        }

        printerDriver.closeChannel();
    }
}
activity_main.xml
メイン画面の構成を作ります。
こんな感じの配列にします。
<?xml version="1.0" encoding="utf-8"?>
<androidx.constraintlayout.widget.ConstraintLayout
    xmlns:android="http://schemas.android.com/apk/res/android"
    xmlns:app="http://schemas.android.com/apk/res-auto"
    xmlns:tools="http://schemas.android.com/tools"
    android:layout_width="match_parent"
    android:layout_height="match_parent"
    android:orientation="vertical">

    <TextView
        android:id="@+id/tvTellop1"
        android:layout_width="match_parent"
        android:layout_height="wrap_content"
        android:layout_marginTop="50dp"
        android:layout_marginLeft="8dp"
        android:layout_marginRight="8dp"
        android:text="@string/tv_tellop1"
        android:textSize="15sp"
        app:layout_constraintTop_toTopOf="parent"
        />

    <EditText
        android:id="@+id/etInput1"
        android:layout_width="match_parent"
        android:layout_height="wrap_content"
        android:inputType="text"
        android:text="@string/et_input1"
        android:layout_marginTop="5dp"
        android:layout_marginLeft="8dp"
        android:layout_marginRight="8dp"
        app:layout_constraintTop_toBottomOf="@+id/tvTellop1"
        />

    <TextView
        android:id="@+id/tvTellop2"
        android:layout_width="match_parent"
        android:layout_height="wrap_content"
        android:layout_marginTop="15dp"
        android:layout_marginLeft="8dp"
        android:layout_marginRight="8dp"
        android:text="@string/tv_tellop2"
        android:textSize="15sp"
        app:layout_constraintTop_toBottomOf="@+id/etInput1"
        />

    <EditText
        android:id="@+id/etInput2"
        android:layout_width="match_parent"
        android:layout_height="wrap_content"
        android:inputType="text"
        android:text="@string/et_input2"
        android:layout_marginTop="5dp"
        android:layout_marginLeft="8dp"
        android:layout_marginRight="8dp"
        app:layout_constraintTop_toBottomOf="@+id/tvTellop2"
        />

    <TextView
        android:id="@+id/tvTellop3"
        android:layout_width="match_parent"
        android:layout_height="wrap_content"
        android:layout_marginTop="15dp"
        android:layout_marginLeft="8dp"
        android:layout_marginRight="8dp"
        android:text="@string/tv_tellop3"
        android:textSize="15sp"
        app:layout_constraintTop_toBottomOf="@+id/etInput2"
        />

    <EditText
        android:id="@+id/etInput3"
        android:layout_width="match_parent"
        android:layout_height="wrap_content"
        android:inputType="text"
        android:text="@string/et_input3"
        android:layout_marginTop="5dp"
        android:layout_marginLeft="8dp"
        android:layout_marginRight="8dp"
        app:layout_constraintTop_toBottomOf="@+id/tvTellop3"
        />

    <Button
        android:id="@+id/btnext"
        android:layout_width="match_parent"
        android:layout_height="wrap_content"
        android:layout_marginTop="15dp"
        android:layout_marginLeft="8dp"
        android:layout_marginRight="8dp"
        android:text="@string/bt_next"
        app:layout_constraintTop_toBottomOf="@+id/etInput3"
        />

</androidx.constraintlayout.widget.ConstraintLayout>
activity_print.xml
印刷を確認する画面です。
こんな配列にしてみました。
<?xml version="1.0" encoding="utf-8"?>
<LinearLayout xmlns:android="http://schemas.android.com/apk/res/android"
    android:layout_width="fill_parent"
    android:layout_height="fill_parent"
    xmlns:app="http://schemas.android.com/apk/res-auto"
    android:orientation="vertical">

    <WebView
        android:id="@+id/webView1p"
        android:layout_width="match_parent"
        android:layout_weight="1"
        android:layout_height="0dp"
        app:layout_constraintTop_toTopOf="parent"
        />

    <Button
        android:id="@+id/button1p"
        android:layout_width="match_parent"
        android:layout_height="wrap_content"
        android:layout_marginStart="8dp"
        android:layout_marginEnd="8dp"
        android:text="@string/bt_print"
        android:textSize="15sp"
        app:layout_constraintTop_toBottomOf="@+id/webView1p"
        />

</LinearLayout>
strings.xml
<resources>
    <string name="app_name">Main</string>
    <string name="print_page">Print</string>
    <string name="bt_next">次へ</string>
    <string name="bt_print">プリント</string>
    <string name="tv_tellop1">項目1</string>
    <string name="et_input1">入力1</string>
    <string name="tv_tellop2">項目2</string>
    <string name="et_input2">入力2</string>
    <string name="tv_tellop3">項目3</string>
    <string name="et_input3">入力3</string>
</resources>
build.gradle.kts (app)
plugins {
    id("com.android.application")
}

android {
    namespace = "siba.inu.android.sample"
    compileSdk = 34

    defaultConfig {
        applicationId = "siba.inu.android.sample"
        minSdk = 26
        targetSdk = 33
        versionCode = 1
        versionName = "1.0"

        testInstrumentationRunner = "androidx.test.runner.AndroidJUnitRunner"
    }

    buildTypes {
        release {
            isMinifyEnabled = false
            proguardFiles(getDefaultProguardFile("proguard-android-optimize.txt"), "proguard-rules.pro")
        }
    }
    compileOptions {
        sourceCompatibility = JavaVersion.VERSION_1_8
        targetCompatibility = JavaVersion.VERSION_1_8
    }
}

dependencies {

    implementation("androidx.appcompat:appcompat:1.6.1")
    implementation("com.google.android.material:material:1.10.0")
    implementation("androidx.constraintlayout:constraintlayout:2.1.4")
    implementation(files("libs/BrotherPrintLibrary.aar"))
    testImplementation("junit:junit:4.13.2")
    androidTestImplementation("androidx.test.ext:junit:1.1.5")
    androidTestImplementation("androidx.test.espresso:espresso-core:3.5.1")
}
本日の成果
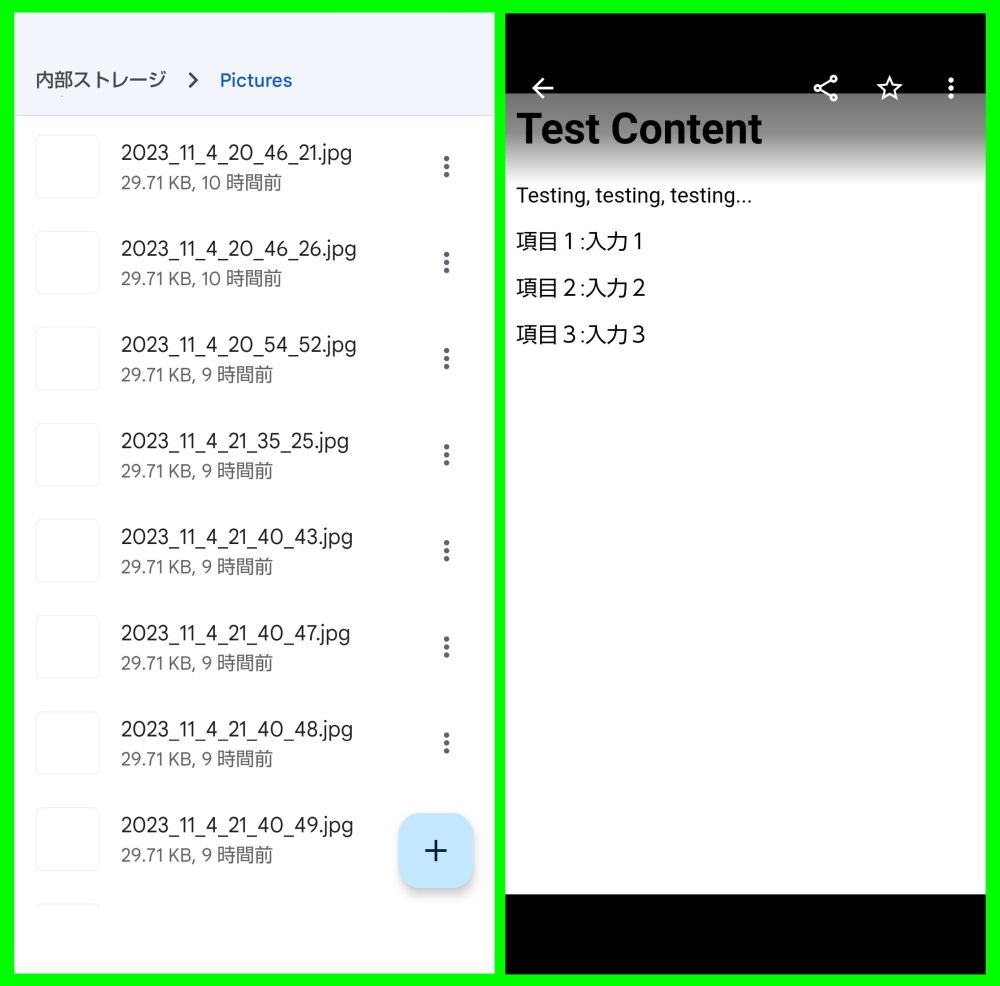
印刷は試せていません。ビューに表示してそれを「Bitmap」を使ってjpgで保存するところまでできています。
確認用画面のボタン「プリント」を押下すると、スマホの「Pictures」にファイルが保存されます。
印刷は、保存されたこのファイルを使います。
左は「Pictures」を開いて保存状況を見たところです。試験で何回か押下しているのでたくさんあります。
右はその中のひとつを開いてみました。
今日はここまでとします。